
An Introduction to Interpreters
This blog post introduces the world of interpreters with an example in Golang. The code comes from the book Writing An Interpreter In Go by Thorsten Ball.
This is a relatively long blog post that divides up the parts of an interpreter into three main parts: lexing, parsing, and evaluation. Check out the post outline for links to specific sections and subsections to get a better overall picture of how each of the pieces fit together.
Post Outline
- What is an Interpreter?
- What are the pieces involved?
- Tokens and Lexing
- Parsing into an AST
- Evaluating the AST
- Putting Everything Together
- Resources
What is an Interpreter
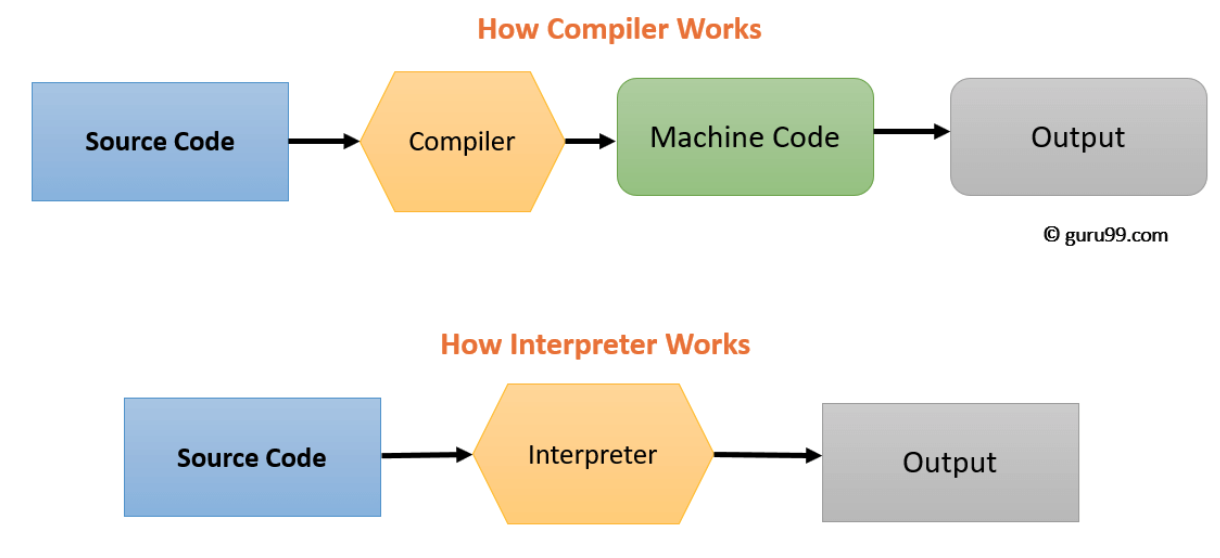
Interpreters take in source code for a program and output the results of running the program. Interpreters produce output by directly executing the instructions specified in the source code. This stands in contrast to compilers, which generate an intermediate representation of the program to be compiled into machine code that is then executed. Here is a diagram that provides a contrasting visualization.
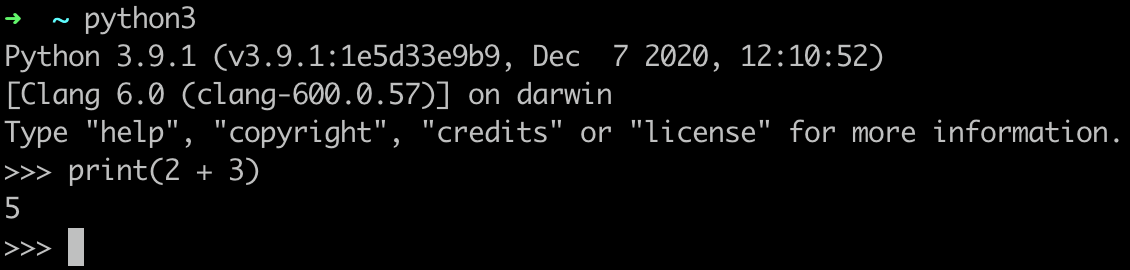
An example interpreter is the Python interpreter in the command line. We can type any valid Python statement into the interpreter and will get the output immediately. One interesting point to note about Python is that in CPython, the standard implementation of Python, Python source code is compiled into Python bytecode, which itself is then interpreted.
Note that the Python compiler is on the complex side of interpreters. CPython applies many optimizations and compiles to bytecode among other features. Simple interpreters would interpret the input right away without any optimizations. The code covered in “Writing an Interpreter in Go” lies in the middle; the source code is transformed into a tree (not bytecode on the complex side) and evaluated. The source code is not directly evaluated as on the simpler side.
What are the pieces involved
A process called lexical analysis is performed by a lexer that converts input source code into a sequence of tokens.
A parser then takes these tokens from the lexer’s outputs to generate an Abstract Syntax Tree (AST), which is a representation of the source code that the computer can understand.
An evaluator takes in and recursively traverses the AST to generate the program’s output.
Tokens and Lexing
Tokens
The first step is to convert the source code into a sequence of tokens using a lexer. But first, what is a token? Tokens represent every little piece of the programming language. In the token definition for the Monkey Language (as presented in the book), tokens can be numbers, strings, identifiers (i.e. variables), keywords (e.g. if, return, function), operators (e.g. =, +) and more. Take a look at the token.go file for all the types of tokens.
In Monkey, a token is represented as a struct:
type Token struct {
   Type    TokenType
   Literal string
}
In this framework, all we need to know to represent a token is its type (i.e. TokenType) and what the actual value (i.e. literal) is. For example, a TokenType could be an ASSIGN operator and the literal would be the string “=”.
Lexer
Now that we have defined the format of the basic blocks that we want to break our source code into, we will use a lexer that takes in the source code and spits out a sequence of tokens that represent the source code.
The pattern used is very similar to the iterator concept, as can be encountered in Java or C++.
Another program that wants to read the source code can iterate through the source code represented as a series of tokens by calling a type of next method.
The lexer, as represented in the struct code shown below, acts as the “iterator” for the source code.
The lexer takes in the source code as a string, represented by the input field.
The lexer as represented in the code is also a struct, just like the Token struct. (note that Golang provides structs instead of classes).
The struct has the following member variables.
The input variable of type string represents the input source code as a single string.
The position, readPosition, and ch variables are used to keep track of how much of the source code the lexer has read so far.
type Lexer struct {
   input        string
   position     int  // current position in input (points to current char)
   readPosition int  // current reading position in input (after current char)
   ch           byte // current char under examination
}
There is a New(input string) function for the struct that creates a new struct (note that Golang is a garbage collected language; the programmer does not have to deallocate memory like in C for example).
The interpreter reads from the sequence of tokens by calling the lexer’s NextToken() method.
This method is akin to the Next() function in the iterator pattern in Java and C++.
Calling aLexerStruct.NextToken() will return the next token to be processed, starting with the first token and advancing one at a time until reaching the last token.
The NextToken() is essentially a huge glorified switch statement with a few extra bells and whistles.
The function uses the ch field to get the next character of the source code to read in.
For example, if the next character read in is +, a plus sign, a new token of type PLUS will be returned.
A more complicated example is determining if the character is part of a keyword or a user defined variable.
If the next token is a letter, the function will read in the rest of the word (if there are any).
The function will then call a function LookupIdent(ident string) defined in token.go that determines if the word is a keyword type (e.g. let) and if not, defines the word to be an identifier type (i.e. variable).
Note that whitespace is ignored by calling the struct’s function skipWhitespace() in NextToken().
Parsing into an AST
The Abstract Syntax Tree
Now that we have a way of turning our input source code for the Monkey language into a sequence of Token structs, we will use a parser to turn that sequence into an internal representation for the computer to work with.
This internal representation is called an AST, which stands for Abstract Syntax Tree.
This can be thought of as a hierarchical tree representation of the source code.
An Abstract Syntax Tree, like other trees in computer science, are made up of nodes.
Each node represents a small piece of the entire program, like a variable declaration or a return statement.
In Monkey, there are two general categories of pieces: statements and expressions.
An example of a statement is let x = 5.
An example of an expression can be 1 + 2, or a function call that produces a value like timesTwo(4).
The general rule is that expressions produce values while statements don’t.
A list of statements make up a program, as defined in the Program struct.
Statements and Expressions are represented as interfaces.
Golang doesn’t support class inheritance (there are no classes in Golang) but it does support embedding, which can solve some of the same design problems.
Embedding can be used to add an interface within another interface to add all of the functions declared in the inner interface to the outer interface.
In this case, we are embedding interfaces.
For example, both the Statement and the Expression interfaces have the base Node interface embedded within.
Examples
To further understand the concepts of a Statement and an Expression, lets delve into an example for each.
In Monkey, a return statement is a type of statement.
It is represented as a struct:
type ReturnStatement struct {
	Token       token.Token // the 'return' token
	ReturnValue Expression
}
We can see that the ReturnStatement struct has a field for the return value, which is of type Expression.
This makes sense because the return statement must return a value, and expressions are values.
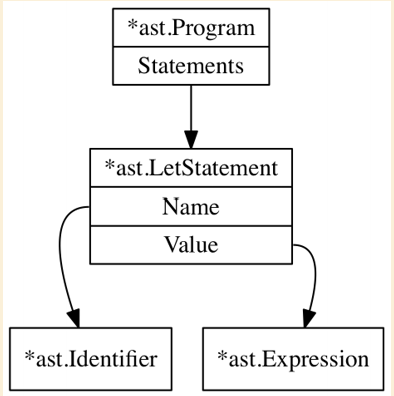
A more complicated example are letstatements, which assign values to identifiers.
They are represented with the following struct:
type LetStatement struct {
	Token token.Token // the token.LET token
	Name  *Identifier
	Value Expression
}
A trivial example of an Expression would be a number, represented as an IntegerLiteral struct:
type IntegerLiteral struct {
	Token token.Token
	Value int64
}
A slightly more complicated example is the representation for infix expressions.
Infix expressions take on the following form: x <infix operator> y.
For example, the addition can be an infix operator if used in the following manner: 1 + 2.
It is represented by the InfixExpression like so:
type InfixExpression struct {
	Token    token.Token // The operator token, e.g. +
	Left     Expression
	Operator string
	Right    Expression
}
Parsing
The parser is represented as a struct that contains several fields.
One important field is the lexer, which was what we discussed previously: a struct that exposes a NextToken() function to iterate through the pieces of the input source code.
Other important fields include the curToken and the peekToken fields which keep track of where the parser is in terms of the tokenized source code.
We will go over the function that is called to parse the whole program, aptly named ParseProgram().
We will then delve into a couple helper functions, parseLetStatement() and parseExpressionStatement(), to solidify our understanding of how the tokens are turned into the AST representation discussed previously.
Note that an expression statement is simply a line in the source code that gives a value without doing anything with it.
A trivial example would be the number 5 on its own line, which is a value (an expression) percieved as a statement (a line in the code which in this case does nothing).
Parse the whole program
The way the ParseProgram() function works is that it continues attempting to parse all the tokens in the source code in a for loop.
Note that this does not mean that the function visits each successive token at each iteration.
The loop, while being called a for loop, acts more like a while loop that continues executing the loop body until the End of File token is reached, signaling that the program is completely finished executing.
The body of the for loop parses the statements out of the sequence of tokens and adds them to the Statements field of the newly created Program struct to return at the end.
func (p *Parser) ParseProgram() *ast.Program {
	program := &ast.Program{}
	program.Statements = []ast.Statement{}

	for !p.curTokenIs(token.EOF) {
		stmt := p.parseStatement()
		if stmt != nil {
			program.Statements = append(program.Statements, stmt)
		}
		p.nextToken()
	}

	return program
}
The way the parser determines that a contiguous subset of the sequence of tokens is a statement is through a helper function called parseStatement().
This function is a switch statement that determines if the current subset is a let statement, a return statement, or an expression statement.
It then calls the appropriate helper function.
We will go over the parser helper functions for the let and expression statements.
Example: parse a let statement
The parseLetStatement() function first creates a new let statement struct to be fill in and return at the end.
It then checks to see if the next token after the let token is an identifier (i.e. the name of a variable).
If not, the function returns nil.
The function then updates the name field of the LetStatement struct and then checks to confirm if the next token is the ASSIGN token (i.e. =) and returns nil of not.
Finally, it is time to parse the expression that is being assigned to the identifier.
The value of the identifier is returned in the helper function p.parseExpression, which is covered in the next example.
Afterwards, the value is set inside of the LetStatement struct.
Since semi colons are optional in Monkey, there is a final check to see if the token after all the pieces of the let statement have been parsed is a semi colon and iterate past it if so.
func (p *Parser) parseLetStatement() *ast.LetStatement {
	stmt := &ast.LetStatement{Token: p.curToken}

	if !p.expectPeek(token.IDENT) {
		return nil
	}

	stmt.Name = &ast.Identifier{Token: p.curToken, Value: p.curToken.Literal}

	if !p.expectPeek(token.ASSIGN) {
		return nil
	}

	p.nextToken()

	stmt.Value = p.parseExpression(LOWEST)

	if p.peekTokenIs(token.SEMICOLON) {
		p.nextToken()
	}

	return stmt
}
Example: parse an expression
When parsing expressions, we will use a technique called Pratt Parsing.
To understand pratt parsing’s strategy, lets take a look at the - token (i.e. the minus token).
This token can be used either to represent a negative number (e.g. -1) or a subtraction operation (e.g. 5 - 2).
The first representation is part of a prefix expression while the second representation is part of an infix expression.
Note on the other hand the ! token (i.e. the bang token).
This is used to represent the not operator for booleans.
It is possible to write ! cond (i.e. a prefix expression) but not to write x ! y (i.e. an infix expression).
The idea behind Pratt parsing is that each of these operator (e.g. -, !) tokens can be associated with being part of an infix or a prefix expression if valid.
It depends on what the source code says.
The function that parses expressions is called parseExpressionStatement().
This is essentially a wrapper function that calls parseExpression(), where the core of the parsing occurs.
func (p *Parser) parseExpression(precedence int) ast.Expression {
	prefix := p.prefixParseFns[p.curToken.Type]
	if prefix == nil {
		p.noPrefixParseFnError(p.curToken.Type)
		return nil
	}
	leftExp := prefix()

	for !p.peekTokenIs(token.SEMICOLON) && precedence < p.peekPrecedence() {
		infix := p.infixParseFns[p.peekToken.Type]
		if infix == nil {
			return leftExp
		}

		p.nextToken()

		leftExp = infix(leftExp)
	}

	return leftExp
}
The first thing the function does is check if the next token is a prefix expression or not (e.g. =, the equal sign).
If not, an error is logged and the function returns.
If the next token is a prefix, we return that later on in the function.
Then, there is a loop that essentially parses the rest of the expression (as signified by the semi colon).
The loop has two conditions: one involving the semi colon (signaling termination) and the other involving precedence
Precedence is an integral part of parsing.
We see a precedence check in the second condition of the loop in parseExpression().
Monkey defines precedences in the following order.
const (
	_ int = iota
	LOWEST
	EQUALS      // ==
	LESSGREATER // > or <
	SUM         // +
	PRODUCT     // *
	PREFIX      // -X or !X
	CALL        // myFunction(X)
	INDEX       // array[index]
)
This hierarchy is used throughout the parsing to check for precedence (i.e. in what order to parse the tokens).
Now let’s analyze the body of the loop.
First there is a check to see if the next token is a infix operation or not.
If the next expression is not an infix operation, return the left expression (which would indicate that the prefix expression which just a value).
The left expression is calculated by calling the respective prefix expressions registered in the New() method of the Parser struct.
For example, we could return a boolean value if the leftExp was a boolean.
Now for a more complicated prefix example.
If our expression was -5, then parsePrefixExpression() would be called with the negative being set in the associated PrefixExpression struct (as defined in the AST).
Then, parseExpression() is recursively called on the next token.
In this case, our next token is 5 and the call would result in parseIntegerLiteral() being called.
This would then result in having the Right expression-typed field in the PrefixExpression struct set to the IntegerLiteral.
On the other hand, if the next token is an infix operation, then nextToken() is called.
This function advances the lexer (i.e. the source code’s iterator) by a single token.
Then when infix is called, it calls parseInfixExpression() with the left expression as input (as that is what the particular token was mapped to in the New() function).
func (p *Parser) parseInfixExpression(left ast.Expression) ast.Expression {
	expression := &ast.InfixExpression{
		Token:    p.curToken,
		Operator: p.curToken.Literal,
		Left:     left,
	}

	precedence := p.curPrecedence()
	p.nextToken()
	expression.Right = p.parseExpression(precedence)

	return expression
}
The function parseInfixExpression() takes in the left value of the infix expression, parses the right expression by calling and returns the expression struct
(gets the right expression by recursively calling the parseExpression() function).
When we finally return back to the type parseExpression, the output will have been a subtree of the AST tree representing the parsed expression.
Evaluating the AST
The code for evaluating the AST that is returned by the parser is in evaluator.go.
The main function has the signature: func Eval(node ast.Node, env *object.Environment) object.Object.
The first parameter is an ast.Node, which, when first called, will be the entire program represented by ast.Program.
We will see this later in the repl that the user directly interacts with in the last section.
The other parameter is a pointer to an object.Environment.
The environment stores all the particular variables declared so far in the current program.
This is important because if we have initialized a particular variable to be of a certain value, we want to remember that for later on when we want to use that variable.
The output is a generic object.Object.
For example, this could be a value if some value is returned or nil of nothing is returned.
The body of the Eval function is essentially a giant switch statement that executes a different block depending on the specific subclass type of the input ast.Node.
This is because Eval is called recursively by certain cases.
For example, if the input ast.Node was a return statement, the expression representing the value of the return statement would also be passed through Eval.
Let’s take a look at the case where the input is of type ast.Program.
In this case, the evalProgram function is called.
The evalProgram function loops through each statement in the program and calls Eval on them.
func evalProgram(program *ast.Program, env *object.Environment) object.Object {
	var result object.Object

	for _, statement := range program.Statements {
		result = Eval(statement, env)

		switch result := result.(type) {
		case *object.ReturnValue:
			return result.Value
		case *object.Error:
			return result
		}
	}

	return result
}
We go back to the Eval function.
Notice that the cases span every possible statement in Monkey.
Let’s see a couple examples.
There is a let case for defining variables (they are saved to the environment) as shown below.
val := Eval(node.Value, env)
if isError(val) {
    return val
}
env.Set(node.Name.Value, val)
There is a function evalInfixExpression() if the statement was an infix expression.
The function has a switch statement that covers every possible type of infix operator and performs the operation.
Note that if the inputs are integers, the function evalIntegerInfixExpression() is called, which is yet another switch statement that performs operations such as multiplication, addition, and so on.
func evalInfixExpression(
	operator string,
	left, right object.Object,
) object.Object {
	switch {
	case left.Type() == object.INTEGER_OBJ && right.Type() == object.INTEGER_OBJ:
		return evalIntegerInfixExpression(operator, left, right)
	case left.Type() == object.STRING_OBJ && right.Type() == object.STRING_OBJ:
		return evalStringInfixExpression(operator, left, right)
	case operator == "==":
		return nativeBoolToBooleanObject(left == right)
	case operator == "!=":
		return nativeBoolToBooleanObject(left != right)
	case left.Type() != right.Type():
		return newError("type mismatch: %s %s %s",
			left.Type(), operator, right.Type())
	default:
		return newError("unknown operator: %s %s %s",
			left.Type(), operator, right.Type())
	}
}
Putting Everything Together
To see all the parts fitting together, let’s take a look at the Start() function in repl.go, which is called by main.go when the interpreter starts up.
The repl is responsible for continuously reading in the user’s input program, executing it, and returning the output.
If we look inside the for loop, we can see that first the prompt is printed and then a scanner is called to read in the user’s code as a string.
A lexer created with the source code.
A parser is then created with the iterator associated with the source code.
The ParseProgram() function, as covered previously, is then called to turn the sequence of tokens produced by the lexer into an AST.
Assuming no errors, the evaluator calls Eval() on the input program.
If the result is not nil, it is printed for the user.
func Start(in io.Reader, out io.Writer) {
	scanner := bufio.NewScanner(in)
	env := object.NewEnvironment()

	for {
		fmt.Printf(PROMPT)
		scanned := scanner.Scan()
		if !scanned {
			return
		}

		line := scanner.Text()
		l := lexer.New(line)
		p := parser.New(l)

		program := p.ParseProgram()
		if len(p.Errors()) != 0 {
			printParserErrors(out, p.Errors())
			continue
		}

		evaluated := evaluator.Eval(program, env)
		if evaluated != nil {
			io.WriteString(out, evaluated.Inspect())
			io.WriteString(out, "\n")
		}
	}
}
Running the code
The code from Writing An Interpreter In Go by Thorsten Ball can be found in this repo.
To run a test, navigate to the src/monkey directory and run go test ./<test name>.
For example, running the test for ast would be go test ./ast.
To run the actual Monkey interpreter, navigate to the src/monkey directory and run go run main.go.